Putting acrylic nails is becoming a service that most beauty and beauty salons are offering in all parts of the world, since women have the desire for their nails to look good and also to be durable.
Many times we access these centers because we think it can be difficult to put them on ourselves, but the reality is that you can do this at home if you have the necessary material and knowledge that is required for it. Continue reading how to put on acrylic nails.
The application of these nails
What always worries us when thinking about sticking acrylic nails is that they are well adhered, since the nails must be well glued to our real nails in a way that is safe and of course that they are fixed. What happens many times, is that they are not fixed as they should be and therefore fall quite quickly.
Keep in mind that the hands are a part of our body that we use a lot for various activities, all the time we are moving them, putting them in contact with objects and exposing them to rubbing. Even many times we need our nails to do something. All of the above will make that if the nail is not well glued and fixed, it peels off easily and then falls off. So the trick is definitely to stick them well.
Nail gluing
Prepare
You must start by washing your hands very well, see that there are no remains, especially enamel and you must cut your real nails looking for them to be short.
Cuticle
When you stick your acrylic nails on your real nails, you must be very careful that the cuticle is not stuck to the false nail, because what is intended is that it is stuck to your natural nail and not to your skin. Take a toothpick and proceed to separate your cuticles, push them towards the edges of the end. It will be easier if you take a bowl of warm water and soak your hands there, so you can run your cuticles easier.
File
It is possible that you are thinking that this is to give the shape you want to your acrylic nails, although it is true, it is not used only for that, it is also to remove shine from your real nails, looking for them to be a little rougher, for this file above your nails, this is with the aim that acrylic nails adhere better.
It also files acrylic nails so that they adapt to the shape and size of your real nails and to give them the length you want. It’s usually a process that needs to be done.
When you finish all the filing processes, do not forget to remove all that dust that remains, a little of it can make your nails not stick well. For this you can brush this dust, or even better if you pass a cotton swab previously impregnated in water, then proceed to use primer so that you eliminate moisture well and your natural nails are already perfect to be the base of your acrylic nails.
Nail gluing
The time has come to glue the nails, you have to be clear about which one will go on each of your fingers according to its size and shape. If you get to put a size that does not go well with the shape of your finger, you will begin to take off and you will also feel some pressure which can be uncomfortable and sometimes even painful, for this reason all should be very well adapted to your fingers.
Put some resin on the tip of the acrylic nails and stick them on the edge of your real nails (remember not to go and stick them on the cuticle), in other words it is not exact on the edge but a little higher, exert pressure for about ten seconds while you wait for it to dry. You will have to do this with each nail.
Once it is fixed, take a good look at how the length of the acrylic nail is, as well as its edges and if necessary proceed to file it.
Pearls
Proceed to create pearls made of acrylic and put the ones you consider necessary in each of your nails.
Apply these from the point where they are, until you reach the sides and also up and down while flattening slowly.
You should start with the line that receives the name of the smile by the lower edge, then flatten the acrylic beads and then expand looking for the transition with the tip of the acrylic to be smooth. To give it some naturalness, the transition should be smooth and smooth.
Now file for you to soften the edges and also the entire structure.
Gel or finishing enamel
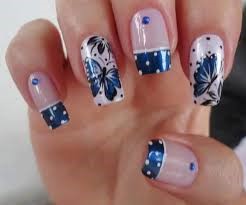
Apply a gel or finishing enamel, you can paint your nails with a style and with designs that you like or know and let them dry. You will also be interested in this article that explains how to put on gel nails.
Another way to end
Put in one container the acrylic liquid and put the powder in another, then pass the brush from the liquid to the solid until you see that a ball has formed, which should be a little wet and also spreadable, to put an end to this, proceed to apply this material for all your nails looking for a totally soft texture where you should not notice any difference between the nails and the skin. Let dry for about ten minutes and then cut them, give them the shapes you want and paint them to your liking.
Notes
- A great advantage that acrylic nails have, compared to gel or porcelain nails, is that they have a longer duration.
- If you take good care of your acrylic nails, they can last up to a period of six months.
- Acrylic nails are made by means of molds that recreate in a very exact way the real nails.
- Acrylic is produced by mixing a polymeter that is powdered with a special liquid, and when dried takes on a plastic-like consistency.
- Usually women do not feel weird or strange when using this type of nails.
- With this it is sought to have beautiful nails and without spending much, in fact among the false nails, acrylic are the most successful since they give a quite natural appearance.
- If you think that you do not have much pulse and that they cannot fit you well, it will always be advisable to attend a beauty or aesthetic salon or center where you will surely be very happy with the result.
- Putting on acrylic nails can be a good option if you have an important event such as a marriage. You can find them in different colors and with different drawings.
- If you are a person who likes to bite your nails, this may be a good option for you, since you will not want to damage them and more if you have had a hard time putting them on.
- If you drop some glue on your skin, even a drop, proceed to remove it immediately, because if it dries out it will be very difficult to remove it.
- It is highly recommended that you apply your nails in an area that is ventilated.
- If bubbles form between your acrylic nails and your real nails, you should remove the nails using acetone and put them back on, as the bubbles can weaken your real nails and even produce some fungus or infection.


