The aesthetics of our hands is a matter in which we do not stop innovating. This time we present nail gradient, a very easy technique to perform that will give your nails an original and very beautiful look, with which you will leave everyone surprised. Find out how to make a gradient on your nails by following a few simple steps.
What do you need to make a gradient in the nails?
- Manicure set (scissors, remover, nail file, pliers…).
- Colored nail polishes (ideally you should use two colors, three at most).
- Transparent nail polish with shine.
- Nail hardener.
- Makeup sponge.
- Hand cream.
- Nail polish remover.
- Cotton buds.
Instructions for making a gradient on the nails
- This step is optional. Prepare your nails. Before decorating your nails it is important that the limes and cuts, giving a visual effect of cleanliness. Thus, making a gradient in the nails will have a much more beautiful result.
- Put your hands in hot water so that both nails and skins soften.
- Dry your hands.
- Remove the skins that protrude from the areas near your nail, using manicure pliers that allow you to cut them flush with your finger.
- Use a pencil remover or orange stick to retract your cuticle if you have it far ahead. Do not eliminate it, just retract it to the finger so that it does not look so much or paint it.
- Cut your nails giving them the shape you like the most. We recommend the rounded shape if you use your hands a lot since the square shape will be filed due to wear.
- File your nails to remove any any splinters that may have remained.
- Wash your hands to remove the remains of the nail.
- Once you have done the basic manicure, apply a layer of hardening enamel to protect your nails and better fix the design you are going to make. It is important that this layer is as thin as possible so as not to accumulate extra enamel on the nail.
- At this point it is time to choose the colors that you are going to use to make a gradient in the nails.
- The ideal way to learn is to use only two colors.
- You can use two enamels of the same tone, one lighter than the other.
- You can also choose any color you like and downgrade it with white or beige. Or the other way around, a vivid color and darken it until it ends in black.
- Especially attractive to the eye is the mixing of two complementary colors. These are the “opposite” colors (orange-blue, red-green, yellow-violet…).
- The choice of colors is to everyone’s liking.
- Give your nails a first layer of the lightest color you’re going to use.
- Let the enamel dry completely.
- Put hand cream on your fingers, around your nails. This will prevent much of the enamel from sticking to the skin.
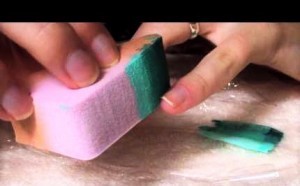
- Moisten a sponge of those used to apply makeup. It is important that it is not dry so that it does not absorb the enamel too quickly and dry out.
- Paint on the sponge stripes of the colors you want to use to make the gradient.
- To do this, do not try to paint it as if it were your nail. Take a lot of enamel in the applicator brush and try to drop it on the sponge, without dragging it, because, the more we drag, the more it will remain fixed on the sponge, wasting.
- Sort the colors from lighter to darker, according to the position you want to give them on your nail.
- Go running the sponge through your nails, pressing little by little to seal the enamel on them.
- You will notice that both colors stay on the nail but that the gradient does not appear from the beginning. Give small touches looking to mix the colors.
- Let the gradient dry.
- If you think it’s necessary, redo the gradient so that the colors look completely opaque.
- Wash your hands to remove the cream and leftover enamel.
- If there is still enamel left on your fingers, soak some cotton buds with nail polish remover and use them to clean yourself.
- When the result is to your liking, give a last layer of enamel to your nails, this time with transparent shine.
Tips for making a gradient in the nails
- When choosing the colors, if you have short nails, it is best to use only two colors so that they do not mix, if not, the gradient will be imperceptible. With longer nails you can use one or two more colors, as long as the gradient is done from top to bottom and not from side to side.
- Make sure that the sponge you use has a surface as smooth as possible so that holes are not filled with enamel.
- You can test the result on a piece of paper to know how much you have to press the sponge.
Here we leave you a couple of articles that you will surely also find very interesting.


