The eyeliner, or “eyeliner” in English, has become an essential product in our makeup bag. It highlights the look, makes the eyes larger and longer and looks good on any occasion. Who hasn’t dreamed of a uniform and symmetrical eyeliner? Although at the moment of truth and if you do not have much practice, it can be difficult to achieve the result we want. However, there are many techniques and tricks that can help you.
If you want to know how to make a perfect eyeliner, this is your article! Here you will find all the details you need: types of eyeliners, tricks, styles of outlines… Keep reading!
How to use an eyeliner step by step
There are simpler products than others to outline the eyes, for example, pencils or thick downs. While liquid and fine-stroke eyeliners are the most complicated to master. You can start by practicing with easy eyeliners and then continue with others.
How to outline the eyes with pencil
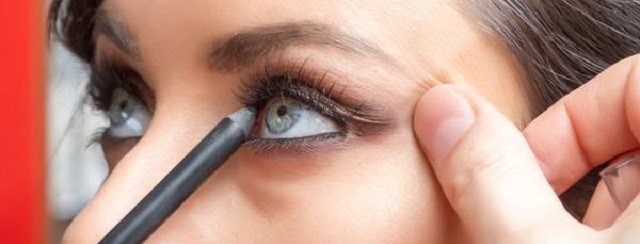
The pencil is ideal to start practicing. Its finish may be somewhat less intense than other types of eyeliners, but it is easier to apply and correct. This eyeliner has the advantage of being able to be used in the water line, highlighting more the color and shape of your eyes.
For the result to be good, make sure that the tip is well sharpened. I recommend you to draw the line little by little from the tear to the other end of the eye. The thickness and length depends on your preferences.
A trick to make the pencil eyeliner more intense is to place the prebase for eye shadow in the area before. If you do not have this product, you can use liquid or cream concealer.
How to use a gel eyeliner
The gel eyeliner is increasingly used as it is more easily corrected than liquid and is very intense. Normally the format is a round and small container where the very concentrated pigment comes. To place it, you will need a special brush that has the tip at an angle. This brush is also used to make up the eyebrows, so you can give it both uses.
To apply it, lightly dip the brush in the gel. Do not impregnate it too much at first, covering only the tip will be enough. Gradually make up the eyelid just above the lash line by changing the angle of the brush according to the curvature of the eye. Start with a fine and little intense stroke and continue applying product until you get the thickness and intensity you want. Remember that this product takes a few seconds to dry completely. When you place it, try not to move your eyelids for a moment so that you do not stain the surrounding skin.
To apply liquid eyeliner correctly, make sure that the brush is not too soaked with product. This could cause the outline to take longer to dry, expand, or become too thick. It begins in the part closest to the tear and progresses very little by little to the end of the eye. The best way to do this is by tilting the brush a little so that the stroke is thinner in the center of the eye and thicker at its end. Let the product dry for a few seconds.
Have a cotton swab impregnated in makeup remover at hand to remove possible stains or imperfections in the stroke. One trick to prevent the eyeliner from erasing or expanding through the eyelid is to place some black eye shadow on top once it has dried. This step is not usually necessary if you have a permanent, waterproof eyeliner.
Tricks for a perfect eyeliner
It is true that, despite following all the indications, it is still complicated to use an eyeliner. However, there are many simple eyelining tricks that anyone can do and that I teach you below. These tricks will serve you if you want an outline with “wings” or “rabillos”. The advantages of this stroke is that it lengthens the eye, makes it look bigger, serves any occasion and never goes out of style.
These tricks give the possibility to make the stroke more or less long according to the style you want. Thus, you can start the stroke in the center of the eye and draw a small wing, or cover almost the entire eye if you prefer something more striking and intense.
Draw guides
The most traditional technique for eyelining is to draw guides before you begin. The guides can be made in the form of points, or by drawing an approximate line with shadow or eye pencil.
For points, help yourself with a fine-tipped brush. Lightly mark the points according to the route you want and then join them with eyeliner. The more points you make, the easier it will be for you.
Another technique is to draw the guide with pencil or eye shadow. Remember that it is just a guide, do not mark it too much or focus on making it perfect. If the guide finally protrudes from the line of the eyeliner, you can erase it with a swab impregnated with makeup remover or blur it with a brush for eye shadows.
Card
A widely used trick to draw the “corner” or “wing” of the eye, is to use a plastic or cardboard card that you no longer need. The procedure consists of placing the card at the end of the eye with the desired inclination and sliding the eyeliner over it. Once the corner is marked, it will be much easier to continue the stroke on the rest of the eyelid. Always try to make the mark thicker at the end of the eye and thinner as it approaches the eyebrow.
Adhesive tape
We can make a variant of the above trick with any adhesive tape. This technique can be even more effective as a “template” is made for the entire outline of the eye. Use this trick if you want a thicker, more angular finish.
Place a piece of tape from the bottom of your eye to where you want the corner to go. Then, tap another tape from the beginning of the upper eyelid to the end of the eye. Accommodate the more or less inclined zeal depending on whether you want a more impactful result or not.
Cleansing
It is about using makeup remover to define and match the outline of the rabillos. To do this you must cut a disc of makeup remover cotton in half, so that it is straight. Once soaked in makeup remover, pass it through the lower part of the eye just below the outline. Remember to pass it with the desired inclination and from the bottom up.
Spoon
Another way to use an eyeliner in a simple way is to use a spoon. Start by placing the handle of the spoon at the end of the eye to draw the corner. Then, place the spoon on top of the upper eyelid to guide the delineation of this area. Join it with the “wings” you already drew. You can also make marks first by using the spoon and then fill them carefully. If you use liquid eyeliner, be patient and let it dry before each step. Clean any traces of eyeliner that may have remained on the spoon before changing its site to avoid stains.
Types of delineation
Each eyeliner allows for different delineation styles. It all depends on whether you prefer a natural, impactful, dramatic, or original result. Normally black outline is used, but in the market there is a variety of colors that you can try. For example, if you want a simple and discreet finish, opt for brown eyeliners. These are ideal for light hair. On the contrary, if you are looking for a more striking and cheerful look, dare with blues, greens, purples … Combine it with the color of your clothes or accessories!
Next, I explain how to make various types of eyeliners according to your style and occasion:
- Natural: To highlight your eyes naturally, choose eyeliners in pencil or gel. Instead of drawing a line, you can fill in the gaps between your top tabs. Gently brush the pencil or brush to make it less intense, or use brown eyeliners instead of black.
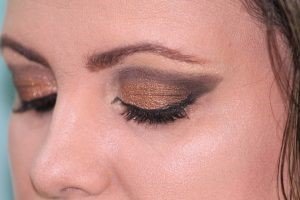
- Smoked: or “smokey eye” is achieved with pencil or eye shadow. Once the line on the upper eyelid is drawn, extend the product gradually to the outside of the eye with a brush. Blur more as you move away from the eye to create a gradient effect. If you want a more dramatic result (ideal for the night) you can also apply it to the lower part of the eye.
- “Cat eye” outline: This type of outline is intense and gives a lot of depth to the look, but it makes the eyes smaller. You can do this by painting the entire water line with eye pencil (it’s less durable because moisture in the eye can erase it little by little), painting a line that surrounds the entire eye, or combining both. To achieve the “cat’s eyes” effect, make a small beak that highlights the tear and do not forget to draw rabillos.
- Original: if you are looking to highlight the look in a different way, the liquid eyeliner allows you to accurately draw the figures you want. You can go beyond the typical outline and try something different: points, strokes that cover the upper part of the eyelid, dashed lines, figures, prints … And even colors other than black or brown, do you dare with white?
Tips for using an eyeliner
To make eyeliner perfect, don’t overlook these tips:
- Supporting the elbow of the hand you put on makeup on a stable surface will help you keep your arm firm to evenly draw the eye line.
- Try not to let the outline be separated from the lash line (if this is not your intention!). It is preferable to fill this gap, even if there is a thicker line.
- There are people who help to stretch the eyelid a little to paint it better. The best way to do this is to place a finger just below the end of the eyebrow and pull it out gently.
- Make sure the outline of the lower part of the eye is softer, clearer or blurred than that of the upper part if you do not want your eye to appear much smaller. Delineation only at the bottom of the eye will also cause this effect.
- To achieve a more intense finish with pencil eyeliner, before starting to paint heat the tip of it a little with the help of a hair dryer.
- Avoid an outline that is just as uniform and thick throughout the eye. To highlight its shape, it is best to start with a finer stroke that widens little by little until it reaches the corner where it must be refined again.


